I know putting a quilt together so it is ready to be quilted can be quite a pain. There are so many methods to choose from. I have to say, I have never used the same method twice. This method with fusible batting, I will using again and I thought I would take a moment to share it with you.
By the way this is in no way a sponsored post. It is just my experience with Heirloom® 80/20 Fusible Cotton Blend and some notes to maybe make it easier for others who decide use this product too.
Step one: Lay out your backing. Make sure you smooth out the backing, tight but not taut. Also make sure it stays straight. I do this by finding the center and centering it in the middle of the table.
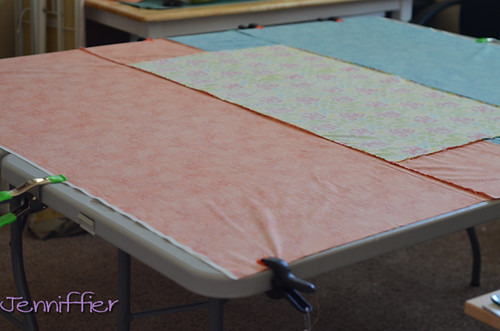
For this method, I used two 6x3 foot table that I bought on sale earlier this year. Don't pay full price, wait for the sale, I got mine for less than half than that website states. Then I used clamps. I got the big ones at Lowe's and the little ones at harbor freight. Both kinds were less than a dollar a piece. I like clamps because I can move them around as needed. Tape always seems to move on me. Also, if my quilt was larger, I could just leave the sides hanging off and clamp so the center was tight. Then move the quilt and clamp again.
*I did fix that little bubble right after the picture. I also didn't have enough big clips so I added some painters tape in places that needed some extra help. Had I made the backing a little larger or had some more large clamps that would not have been necessarily.
Step two: Lay out your fusible batting. Match up at the top corner and along one side. Open clamps and re-clip in place. Smooth out batting. Then trim to fit. Re-clamp on other-side, top and bottom. Make sure to smooth as you go. The batting is tacky. So it will stick together. Just work with it and smooth it out. The tackiness does not stick to you.
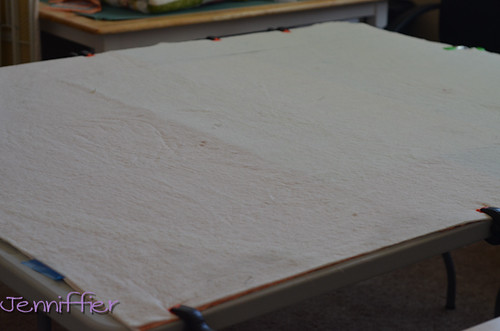
Step Four: Iron with steam. Make sure your iron is all the way up and you just filled the reservoir. I didn't and the press wasn't very good at first. To make it stick together all you do is press for just a quick bit and move on to the next little bit. Press not iron, if you iron it makes bubbles and stretches the fabric. If you do get bubble or stretches they are easily fixed. As you can lift up your top, smooth out and press again. Remember pressing is put the iron down, wait a couple seconds, lift and place it down again right next to wear you just pressed.

Here are the directions from the Hobb's website:
Step Five: Flip over and press the backing on too.
Now the Hobb's website said you can fuse all three layers at once. It sorta worked. I even let it sit came back and added more water to my iron and tried again on the front. The batting stuck to front great, but the backing was only ok, and I didn't feel it would hold up to being squished in my machine as I free motion quilted it. So I just flipped and pressed again on the back.
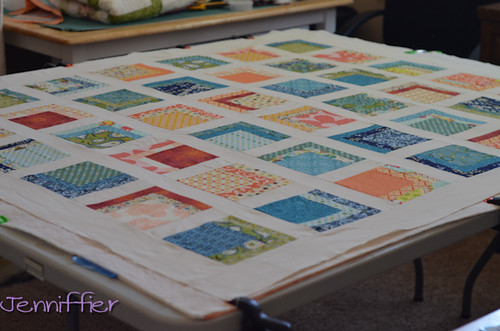
Step Six: Let it rest or It is ready for quilting.
Now you could get right to work after you are finished pressing it and it has cooled (which is about 2 minutes), but I think it important to set the quilt to the side and admire the fact that you just made a quilt sandwich that you can quilt at anytime you really want to.
Overall thoughts:

| {image source} |
Step one: Lay out your backing. Make sure you smooth out the backing, tight but not taut. Also make sure it stays straight. I do this by finding the center and centering it in the middle of the table.
For this method, I used two 6x3 foot table that I bought on sale earlier this year. Don't pay full price, wait for the sale, I got mine for less than half than that website states. Then I used clamps. I got the big ones at Lowe's and the little ones at harbor freight. Both kinds were less than a dollar a piece. I like clamps because I can move them around as needed. Tape always seems to move on me. Also, if my quilt was larger, I could just leave the sides hanging off and clamp so the center was tight. Then move the quilt and clamp again.
*I did fix that little bubble right after the picture. I also didn't have enough big clips so I added some painters tape in places that needed some extra help. Had I made the backing a little larger or had some more large clamps that would not have been necessarily.
Step two: Lay out your fusible batting. Match up at the top corner and along one side. Open clamps and re-clip in place. Smooth out batting. Then trim to fit. Re-clamp on other-side, top and bottom. Make sure to smooth as you go. The batting is tacky. So it will stick together. Just work with it and smooth it out. The tackiness does not stick to you.
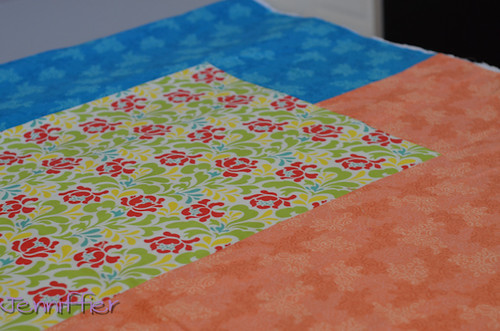
Step Three: Lay out your top. Smooth it down. Since the batting is tacky/sticky, I didn't need to worry about the top moving once I placed it. If I wanted to move it, then I just pulled it up and re-positioned it. Work with you top to make it nice and smooth.
Step Four: Iron with steam. Make sure your iron is all the way up and you just filled the reservoir. I didn't and the press wasn't very good at first. To make it stick together all you do is press for just a quick bit and move on to the next little bit. Press not iron, if you iron it makes bubbles and stretches the fabric. If you do get bubble or stretches they are easily fixed. As you can lift up your top, smooth out and press again. Remember pressing is put the iron down, wait a couple seconds, lift and place it down again right next to wear you just pressed.
"To fuse all three layers of your quilt at once, set your iron on a wool or cotton setting with steam. Simply press your quilt from the center to the outer edges. Be sure you keep your iron moving, pressing approximately 2-3 seconds in each area. This is only a temporary fuse. If you make a mistake or have a crease just simply lift the fabric and reapply the iron to fuse again."
Step Five: Flip over and press the backing on too.
Step Six: Let it rest or It is ready for quilting.
Now you could get right to work after you are finished pressing it and it has cooled (which is about 2 minutes), but I think it important to set the quilt to the side and admire the fact that you just made a quilt sandwich that you can quilt at anytime you really want to.
Overall thoughts:
- The batting was easy to use. It did stick to itself a bit, but nothing that wasn't manageable.
- I am glad I didn't have to pin anything.
- It did kinda have a chemical smell to it once you started warming it up, but nothing like spray adhesive. Just a weird smell.
- I would not suggest doing this one the floor, especially hardwood flooring, as the steam would damage it. Nor on a wood table, same problem.
- I shook the quilt sandwich a whole bunch to make sure it would stick. The corners came up a bit, so I just pressed them again and all was good.
- This method was easy and I will use it again. Not to say I won't ever pin again. I am not sure about the loft after washing. I will let you know more after I have quilted it and have given it a good was.
Interesting. I've never tried fusible batting but I might have to give it a go. Thanks for the tutorial, there are great tips here!
ReplyDeleteCool! I just saw a post about fusible thread for biding so this is a great piece to go with that one. My biggest issue with it is not having a big enough place to do it, but I'm definitely keeping it in mind for when I do!
ReplyDeleteI wonder if it would be possible to just iron it on a bed. If I strip the bed down to the sheet, it seems like you could iron on it....not sure if it would hurt the mattress since it is covered.
DeleteWhen I took a FMQ class last summer the instructor first taught us how to steam baste with cotton batting. Most cotton battings will stick to fabric when pressed, you don't really need the fusible batting. She uses a few pins on larger quilts just so there is no movement/shifting on the domestic machine while FMQ. I use this method with all my small quilts only using pins in the corners....
ReplyDeleteWhat an interesting tutorial; thanks for posting this. I hadn't ever thought of buying tables to use specially for basting larger quilts, but that is a fantastic idea!
ReplyDeleteThanks for sharing your tips! I won a roll of fusible batting on a blog but haven't received it yet. I can't wait to try this on my next baby quilt. Not pinning would be heavenly :)
ReplyDeleteThank you so much for sharing this with us! I pin on the carpet as I have no room anywhere else and always create puckers. Buying tables would be a great solution for me that I could easily set up in the garage when I need to baste. Will let you know when I use your tips. :)
ReplyDeleteFascinating, great tutorial! I might just have to give this one a try!
ReplyDeletethanks for your tutorial, I was considering using fusible batting on my latest bed quilt and wasn't sure until now. Glad that I won't have to pin it, it's a bit of a monster;)
ReplyDeleteI enjoyed your tutorial and am now a follower. Perhaps you would like to check out the Gale's Gallery section of my blog http://thedarbycreekdiaries.blogspot.com. Just go to the index by topic link in the upper right corner.
ReplyDeleteThanks so much. Very helpful and reassuring for a new quilter!
ReplyDeleteGlad you found it helpful. I hope your quilt sandwich making goes well :)
DeleteThanks for posting this, very helpful :-)
ReplyDeleteJust one question: I bought the same batting. The only is because it shrinks approximately 3-5% they advised me to wash it first then let it flat dry OR put it in the dryer with normal drying temperature. But honestly, i'm quite 'afraid' to do that for the reason that it might damage the special feature of this batting which is "fusible". Hope you can give me some advise. Many thanks and regards!
Great tutorial Jenniffier! Since it has been a few years since you made this I have a couple of questions about durability. I want to make a quilt that will be used a lot and want it to last.
ReplyDeleteDo you use this quilt regularly?
How did it shrink up after washing?
Is the batting supple or a little stiff from the fusing?
Did the smell go away?
Thanks for any help!
Many thanks for your tutorial. I'm planning to use fusible batting for two large wall hangings I'm working on for Xmas. Very helpful!
ReplyDeleteI have made my quilt top in three sections. Can I use fusible batting on the three pieces separately and then join together with sashing? EdieB
ReplyDelete